Documentation Index
Fetch the complete documentation index at: https://docs.oxen.ai/llms.txt
Use this file to discover all available pages before exploring further.
Oxenβs open source data version control system shines at workflows and data sizes where git or git-lfs fall short. The interface is inspired by git, so that it is easy to learn for engineers, but has a few core differences. Oxen is built from the ground up to handle large datasets with many files or large csvs, parquet files, or other large binary blobs like model weights, videos or 3D assets.
The developer tools come with a CLI, HTTP APIs, and Python library to make it easy to integrate into your workflow.
Versioning 101
On the surface, oxen looks a lot like git. Users can add, commit, data locally then push to a remote server. Similar to git, by default oxen will create a local copy of the data on your machine in your .oxen directory before pushing to the remote server.
oxen init
oxen add lotsa_data/
oxen commit -m "adding too much data for git"
# Create the remote on hub.oxen.ai (or `oxen create-remote --name <ns>/<repo>`)
# and wire it up before pushing:
oxen config --set-remote origin https://hub.oxen.ai/<namespace>/<repo_name>
oxen push origin main
The first main difference is that oxen comes with a remote oxen-server that userβs can sync data to. This server also allows you to upload data directly without making local copies.
SYNC_DIR=/path/to/data oxen-server start -p 3000 -i 0.0.0.0
Say we had already pushed a large dataset to the remote server, and simply wanted to to add a file to a large dataset like ImageNet with 1 Million Files. You do not want to wait to clone all the files locally just to add yours to the server.
from oxen import RemoteRepo
# Connect to the remote client
repo = RemoteRepo("my-username/my-repo")
# Add the images to the workspace without committing.
# Pass `dst=` so the files land under `images/` on the remote.
repo.add("images/image_1_000_001.png", dst="images/")
repo.add("images/image_1_000_002.png", dst="images/")
# Commit the remote changes
repo.commit("Adding the 1,000,001st image to the dataset")
This is just one example of how Oxen.ai enables a more developer friendly workflow for large datasets. There are also optimizations under the hood such as parallel file transfer, scalable merkle trees, and data deduplication to make Oxen go brrr (or mooo?).
Interfaces
The server exposes a REST API that can be used to interact with data. Oxen.aiβs clients include a command line interface, as well as bindings for Rust π¦, Python π, and HTTP interfaces π to make it easy to integrate into your workflow.
Installation
Oxen makes versioning your datasets as easy as versioning your code. You can install through homebrew or pip or from our releases page.
Remote Workflow
Centralized version control systems like Oxen.ai allow you to have remote first workflows where you do not need to have a fully copy of the data on your local machine. Decentralized version control systems like git by default duplicate all the data to every node in your network.
While the decentralized nature of git makes it easy to maintain full copies of the history across many machines, this is not practical for large datasets. Oxen was designed from the ground up to be able to seamlessly switch between local and remote (centralized) workflows. Only clone what you need, and contribute back to the remote repository when you are done.
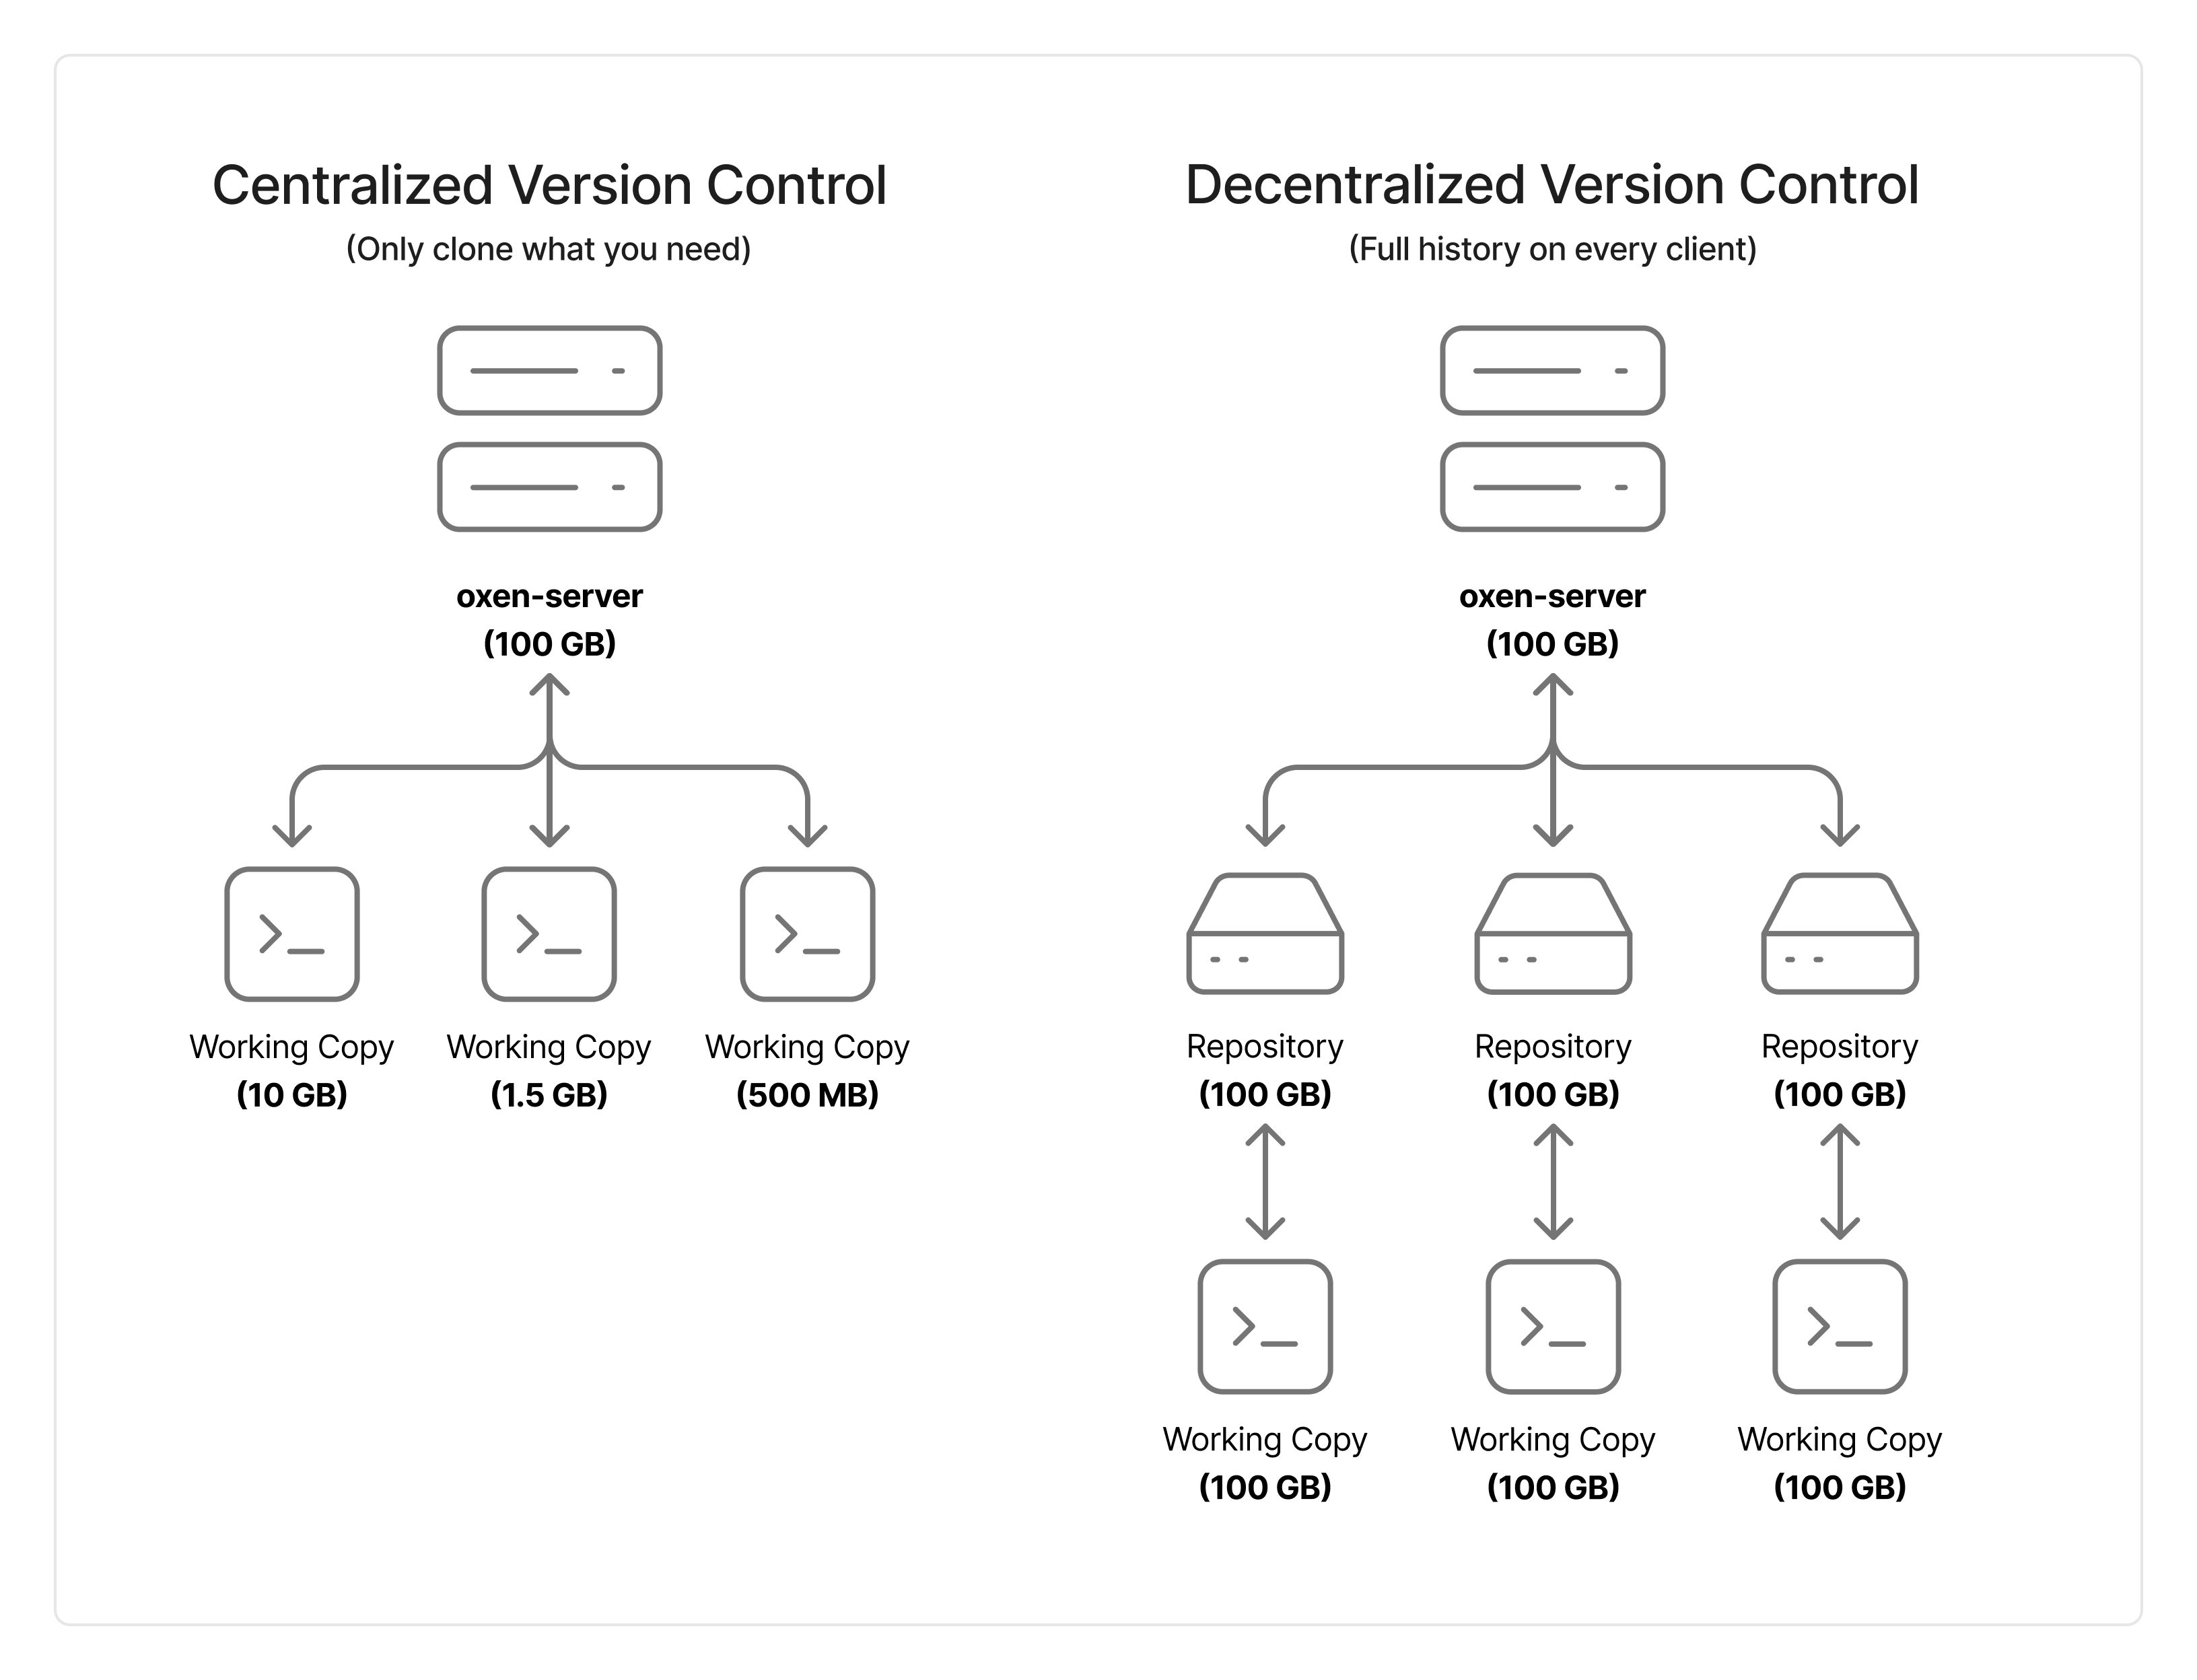
Create a Remote Repository
If you do not already have a remote repository, you can create one with a single README.md and initial commit so it is immediately cloneable.
from oxen import RemoteRepo
# RemoteRepo.create is an instance method β construct first, then call create.
# The Python client adds a README.md and initial commit by default.
repo = RemoteRepo("my-user/my-repo-name")
repo.create()
If you want to create an empty repository β with no README.md and no initial commit β pass empty=True from Python, or simply omit --add_readme from the CLI.
from oxen import RemoteRepo
repo = RemoteRepo("my-user/my-repo-name")
repo.create(empty=True)
The reason you may want to start with an empty repository is if you already started a local repository and want to push it to the remote repository. This local repository already has a commit history. When pushing to a remote, commit histories must match. Hence we need to start with an empty remote repository without any commits if we want to push a local repository with a commit history.
Add Files
You can add files to the remote repository by passing the path to the file and the destination directory. This will upload the file to the remote repository and stage it for commit.
from oxen import RemoteRepo
repo = RemoteRepo("ox/CatDogBBox")
repo.add("images/000000002754.jpg", dst="images/")
Commit Changes
You can commit changes to the remote repository by passing a message.
repo.commit("Adding the 1,000,001st image to the dataset")
File Exploration
To see the files in the remote repository you can use ls.
from oxen import RemoteRepo
repo = RemoteRepo("ox/CatDogBBox")
print(repo.ls())
To view a specific directory you can pass the directory name to the ls method.
Note: the directories are paginated so you will need to use the page_num parameter to view the next page of results.
There are also total_pages, page_number, and total_entries attributes that give you information about the pagination.
from oxen import RemoteRepo
repo = RemoteRepo("ox/CatDogBBox")
images_results = repo.ls("images", page_num=1, page_size=10)
print(images_results)
print(images_results.total_pages)
print(images_results.page_number)
print(images_results.total_entries)
Downloading Data
You can download individual files and folders if you do not need the entire data repository for your job.
oxen download ox/CatDogBBox annotations/test.csv
Checkout a Branch
If you have a data on a separate branch that you want to view you can checkout a branch by passing the branch name to the checkout method.
from oxen import RemoteRepo
repo = RemoteRepo("ox/CatDogBBox")
repo.checkout("my-branch-name")
print(repo.ls())
Create a New Branch
The checkout method also allows you to create a new branch if the branch does not exist.
from oxen import RemoteRepo
repo = RemoteRepo("ox/CatDogBBox")
repo.checkout("my-new-branch-name", create=True)
print(repo.ls())
View Branches
To see all the branches in the remote repository you can use the branches method.
from oxen import RemoteRepo
repo = RemoteRepo("ox/CatDogBBox")
print(repo.branches())
Workspaces
Under the hood, the way that we enable remote collaboration is through a concept called a workspace. A workspace can be thought of as an uncommitted working directory that is stored on the server. Just like you can add files before committing locally, you can add files to a workspace on the remote server before committing. This allows you to build up a set of changes remotely before committing them in bulk.
from oxen import RemoteRepo
from oxen import Workspace
repo = RemoteRepo("ox/CatDogBBox")
# The second positional arg to Workspace is the BRANCH the workspace is tied
# to. The optional `workspace_name` gives the workspace a stable identifier
# so you can reattach to it later by name.
workspace = Workspace(repo, "main", workspace_name="add-images")
workspace.add("/path/to/image.png")
status = workspace.status()
print(status.added_files())
# Commits land on the workspace's branch β "main" in this example.
workspace.commit("Adding the 1,000,001st image to the dataset")
The RemoteRepo.add method is a shortcut for creating a workspace and adding files to it. It creates a ephemeral workspace and adds the files to it, and deletes the workspace after committing.
To learn more about workspaces, check out the workspaces documentation.
Clone a Remote Repository
Remote repositories are identified by a remote URL. This is the URL that you can use to clone the repository.
from oxen import RemoteRepo
remote_repo = RemoteRepo("my-user/my-repo-name")
remote_repo.create(empty=True)
# `url` is a property, not a method β no parentheses.
print(remote_repo.url)
You can use this URL to clone the repository.
# Local Repository
from oxen import Repo
from oxen import RemoteRepo
remote_repo = RemoteRepo("my-user/my-repo-name")
remote_repo.create(empty=True)
repo_url = remote_repo.url
local_repo = Repo("/path/to/local/repo")
local_repo.clone(repo_url)
Or you can set the remote of an existing local repository to point at the remote repository.
from oxen import Repo
from oxen import RemoteRepo
remote_repo = RemoteRepo("my-user/my-repo-name")
remote_repo.create(empty=True)
local_repo = Repo("/path/to/local/repo")
local_repo.set_remote("origin", remote_repo.url)
Local Workflow
Local workflow looks a lot like git. The downside is that you have to duplicate all the data locally. The good news is that oxen is much faster than git for large files and repositories.
Initialize User
Each change you make will be associated with a name and email. Set them before you get started so you know who changed what. The user data is saved by default in ~/.config/oxen/user_config.toml.
oxen config --name "Bessie Oxington" --email "bessie@yourcomany.com"
Create Repository
Initialize your first Oxen repository, and commit the first version of your data.
# Initialize the repository
oxen init
# Write data to a file
printf '%s\n' 'name,age' 'bob,12' 'jane,13' > people.csv
# Stage the data for commit
oxen add people.csv
# Commit the changes with a message
oxen commit -m "Adding my data"
Create Branch
It is good practice to create a new branch for changes you make to your data. This will allow you to easily compare the parallel versions of your data over time.
# Checkout a branch named `modify-data`
oxen checkout -b modify-data
# Overwrite data in existing file
printf '%s\n' 'name,age' 'bob,12' 'jane,13' 'joe,14' > people.csv
Delete Branch
Once finished with a branch, you can delete it.
# Checkout main branch locally
oxen checkout main
# Delete 'other_branch' locally
oxen branch -d new_branch # may need -D if branch is not merged into main
# Delete branch in remote repo
oxen push origin --delete new_branch
Check the current state of your local repository by using oxen status. Instead of printing out every file that was added/modified/removed (which is unsustainable for large repositories), oxen summarizes the changes and lets you page through them.
Restore Changes
If you are not happy with the changes you made to your data, you can restore them to the previous commit with the oxen restore command.
oxen restore --source <commit_id> people.csv
Commit Changes
Once you are happy with the changes you have made to your data, you can commit them to the repository with a new message.
oxen add people.csv
oxen commit -m "Adding Joe to the dataset"
View Commit History
To see the commit history of your repository, you can use the oxen log command.
Checkout Main Branch
Once you are done making changes to your data, you can return to the main branch with the oxen checkout command.
Never fear, the file now has now been reverted to the inital commit again, but your changes will be saved in the branch you created.
List Branches
To see the branches in your repository, you can use the oxen branch command.
Push Data
Once your data has been committed locally, you can sync it to the oxen-server.
Oxen.ai has a web hub that allows you to collaborate on your data in the cloud. You can create a free account at https://oxen.ai.
# Go create repo at https://oxen.ai
# ...
oxen config --set-remote origin https://hub.oxen.ai/<namespace>/<repo_name>
oxen config --auth hub.oxen.ai <your_auth_token>
oxen push origin main
# to push your other branch simply change the branch name from `main` to `modify-data`
To learn more about setting up authentication and authorization, read our security documentation here.
Clone Data
Clone your data faster than ever before. Oxen has been optimized to the core to make pulling large datasets as fast as possible.
oxen clone https://hub.oxen.ai/ox/CatDogBBox
Pull Changes
Only pull the changes you need. Oxen will only pull the files that have changed since the last time you pulled.